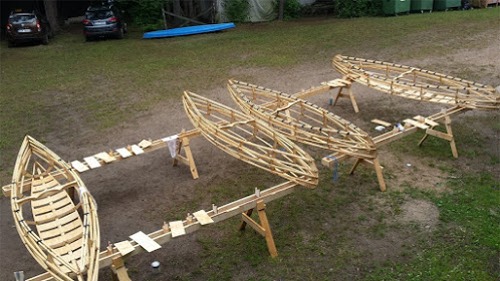
For an introduction, see the Kayarchy chapter Sea Kayak Construction Methods (5) Skin on Frame.
The picture above is from one of Marcin Bober's youth & community boatbuilding sessions in Poland.
The main steps of traditional SOF construction
The procedure for building a kayak or an umiak is basically the same, but things happen in a different order:
A kayak is mostly built the wrong way up, and then turned over to finish the deck and cockpit.
An umiak is mostly built the right way up, but turned over when its time to fit the skin.
Building the frame
| Building an umiak frame: | Building a kayak frame: |
| Make the keel, attach the end posts and their knees. The knees are like angle brackets; they attach the end posts to te keel at the correct angle. | Make the gunwales and cut slots (mortices) in them to receive the ribs and deck beams. You dont sit in a traditional Greenland kayak, you wear it. One of the deck beams is going to be your footrest, and another (the masik) will be your knee brace. Another deck beam will support the back of the cockpit when you sit on it while youre getting in and out of the kayak. |
| Prop the keel / end post assembly up with the end posts vertical. Support the keel on blocks at the ends so it takes up the right curve. |
Lie the gunwales parallel and fit one or two temporary spacers between them, to define the width of the kayak. This keeps the centre of the gunwales apart while you bend them together at the ends. The spacers are planks on edge and theyre longer at the top than the bottom, which starts to induce the correct twist in the gunwales. Use clamps or a Spanish windlass to bring the ends of the gunwales together with the correct twist. Slip a small wooden jig over each end so that when you relax the gunwales are twisted with the top edges further apart than the bottom edges. This is a little touch of Greenland genius. It makes the front and back ends of the gunwales rise up, which defines the profile of the kayak. It also does a lot to define the shape of the cross-section. |
| Attach the headboards (horizontal) to the top of the end posts. Then attach the vertical knees/gussets that brace the headboards firmly to the end post. |
Use a saw, held with the blade vertical and in line with the centreline of the kayak, to cut the ends of the gunwales so that they meet flat. Then make this perfect by using a piece of thin plywood with a piece of coarse sandpaper on one side, held vertically between the ends of the gunwales. |
| Make the gunwales and cut slots (mortices) in them to receive the ribs. Bend the gunwales like a pair of archers bows until theyre the right distance apart. First, set up a temporary mould to hold the gunwales at the correct height and the correct distance apart in the middle. Then use clamps or a windlass to nip the ends of the gunwales together until theyre also the right distance apart. If necessary fix them more securely in position by screwing two temporary diagonal pieces of timber from the middle of the keel up and out to the middle of each gunwale. |
Make the rest of the deck beams. Some curve to create the arch of the deck (crown). These can be laminated with epoxy resin to glue a sandwich of thin battens 1/10-1/8 thick. Clamp the sandwich to a temporary jig until the resin sets. Cut pegs (tenons) on the end of deck beams which will slot into holes (mortices) in the gunwales like the rungs of a ladder. Use a mallet and Spanish windlasses to fit the deck beams and draw the gunwales together, then fix the deck beams (drill holes, hammer in the wooden pegs that are called treenails or trunnels, lash with twine). Hold the ends of the gunwales together again, drill holes through the ends of the gunwales and insert wooden pegs to lock them together. Unless youre going to fit the stem- and stern-posts so that theyre sandwiched between the gunwales, which is stronger but more complicated and possibly less traditional, you can now permanently lash these joints in place with thin twine. You now have a rigid deck assembly like a ladder. |
| Traditionally, an umiak has no deck other than the headboards that link the gunwales at each end. Cut a shallow notch in the underside of the gunwales where the headboards are going to go. Fix the gunwales to the headboards, either with bolts or with wooden pegs and lashing with nylon twine. Trim the headboards so they dont stick out to the sides any further than the gunwales do. |
Traditionally the next step is to fit all the ribs but were going to fit the stem- and stern-post, and fit the keel between them, before doing the ribs. Make the stem- and stern-posts so that they exactly fit the underside of the gunwale assembly (which is now the top, because youve turned the ladder upside down). Drill holes, and lash them into place by passing twine through the holes. Make the keel. Use a spacer block and clamps to attach it to the kayak with the right fore-and-aft curve (rocker) so the kayak will have the right depth in the cockpit. Drill thin holes and lash the keel to the stem- and stern-post with strong twine. Drill some thicker holes vertically down through the end-posts and into the gunwales. Hammer in wooden pegs. |
| Fit at least one pair of stringers, then the ribs. The stringers are the longitudinal pieces that run outside the ribs between the keel and gunwales. So as not to twist the hull out of shape, its important to fit one stringer and then balance it by fitting the same stringer on the other side of the boat. If you fit all the stringers on one side before you do the other side, you may get a banana-shaped boat that goes round in circles. The ends of the ribs slot into mortices that you previously cut in the botton edge of the gunwales. Mortices are typically 1 3/8 (35mm) deep. You dont want to weaken the gunwales, but then you dont want any ribs pulling out under stress. Make pairs of half-ribs, long enough for one end to be morticed in the gunwale. The other end is lashed or nailed to the keel. Lash the ribs to the stringers as you go. |
Now were going to fit the ribs, followed by the stringers that give the skin its shape. The ends of the ribs slot into 7/8 (22mm) deep mortices that you previously cut in the bottom edge of the gunwales. Well make full-width ribs so that each rib slots into both gunwales. Steam the ribs and bend them to shape. Leaving them a little too long at each end, clamp them temporarily to the inside of the gunwales. As they cool, they take up a permanent curve. When theyre all in place, you can see if theyre the right shape. When you can see theyre all the right curve and length, cut them to length, slot them into the mortices and lash them to the keel. Use artificial sinew for this, as it lies nearly flat and doesnt make unsightly bulges under the skin. |
| Check theyre in exactly the right place, then attach them to the keel-stempost-sternpost assembly, either with bolts or with wooden pegs and twine lashing. First cut them roughly to length using a saw held vertically and parallel to the long face of the stem post (parallel to the keel). Then re-cut to get the bevel exactly right. | Fit the stringers, which are the longitudinal pieces that run outside the ribs between the keel and gunwales. Youll have to bend and clamp them into place. They are supposed to bend in only one plane, like a bow. If you find youre fighting the stringer youre probably trying to bend it in two planes. Check theyre in exactly the right place, then lash them to the ribs. Some builders prefer to drill a hole through stringer and rib and peg them together instead. Peg and lash the ends of the stringers to the end-posts. |
| Fit breasthooks (plates that strengthen the connection between the ends of the gunwales), the masik (the deck beam which acts as a knee brace when you roll the kayak) and the short longitudinal battens that will support the skin of the deck behind and in front of the cockpit. Make the cockpit coaming (the wooden hoop that your spraydeck will attach to) by steam-bending a long wooden batten round a former. Sit in the kayak frame with the coaming round your waist and see if everything looks and feels good. |
|
| Drill holes for any deck-lines or other deck fittings (cleats, eyebolts, etc) you may want on the outside of the skin. | Drill holes for any deck-lines or other deck fittings (cleats, eyebolts, etc) you may want on the outside of the skin. For a kayak, fit a ring or block inside the tip of bow and stern, and run a loop of cord through it and back to the cockpit, so you can drag the ends of buoyancy bags right into the ends of the boat. Bruce Lemon lashes the coaming to the frame now, before he fits the skin. Its a little more work to tidy the skin around it, but its a good system. The alternative is not to attach the coaming to the frame in any way, but to sew it to the skin. Robert Morris says any force that could move the rim would be catastrophic enough to drop the kayak to the bottom of your list of concerns. Well, Ive been ripped out of an GRP boat by a big wave and found I was still sitting in the seat wearing the spraydeck. I had to walk home, but if that had happened on a reef or island I could have died. Attach the coaming to the frame too, I think. |
| Finish the wood of the frame with epoxy resin or varnish or oil. | Finish the wood of the frame with epoxy resin or varnish or oil. |
Steps in fitting the skin
| Skinning an umiak: | Skinning a kayak: |
| Make some pencil dashes in a straight line on the cloth to mark where it will lie on the keel. Turn the umiak upside down and lay the skin fabric along it. Using an electric hot knife that seals the edges as it cuts, cut the cloth to length so that the boat is completely covered and the skin hangs down an extra 18 at both ends. |
Make some pencil dashes in a straight line on the cloth to mark where it will lie on the keel. Turn the kayak upside down and lay the skin fabric along it. Using an electric hot knife that seals the edges as it cuts, cut the cloth to length so that the boat is completely covered and the skin hangs down an extra 18 at both ends. |
| Pin or staple the cloth to the stem post. Close it on the stem post by sewing the two sides of the skin together temporarily with a running stitch. Your seam is to match the shape of the stem post. Go to the back of the boat and give a good tug to haul the skin tight. Maintain the tension. If things still look good at the stem post, sew a permanent seam along the same line and cut off the surplus. Go to the stern again and haul in the slack. Pin or staple it to the stern post to keep it in tension, sew it round the stern post and cut off the surplus. |
Pinch the skin together at the stem-post. Sew a temporary small, shallow pocket containing the tip of the stem post. Then unhook pocket from the stem post so the skin is lying loosely on the kayak, and slide the whole skin 3 towards the stern. Pin the fabric in place at the stern, cut along the line of the stern overhang, sew the edges together to make a seam, and then sew a temporary small pocket round the tip of the stern. This time leave the end of the kayak in its pocket. Go to the bow again, and haul the skin forward. Pull hard to stretch the skin lengthways until you can hook the stem into the bow pocket. |
| With the skin now secured at bow and stern, insert a row of staples or pins along the keel to keep it straight. Cut the skin to shape around the gunwale, leaving enough to go up over the gunwale and down half an inch or so towards the thwarts. Make a rolled seam on the edge of the skin all the way round the boat, maybe incorporating a length of braided nylon line for reinforcement and those piped seam looks. Make holes at intervals around the edge of the skin. It may look neatest to make a hole over every rib. Pass nylon line through these and round the riser in a zig-zag from one end of the umiak to the other, until the skin is laced into place. |
With the skin now secured at bow and stern, insert a row of pins along the keel to keep it straight. Turn the kayak the right way up again, and start work on the deck. Christopher Cunningham likes to make the deck seam along one gunwale. Most builders join the skin with a deck seam along the middle of the deck, so they fit temporary battens to the centrelines of the foredeck and rear deck by clamping them to the deck beams. They will help with making a clean cut. Stand 4 from the stern, reach over the kayak, take hold of the opposite edge of skin and pull it towards you to take up the slack. If it reaches the gunwale next to you, pin it in place. Anything that comes over the centreline will eventually be cut off. The kayak is a tapering shape. Work your way forwards to encourage the slack to end up in the cockpit area. Keep hold of it while cutting off all the excess so that it reaches the centreline of the deck, plus just enough to make a seam. Walk round the kayak and do the same from the other side. You want an overlap of at least 1. The quick method is to draw the cut edges together by putting in giant stitches about 2 back from the cut edge, zig-zagging along the boat. As you tighten the stitches, you tension the skin laterally. This is fast and easy because you dont have to measure exactly where the two cut edges will meet, you just sew them together where they lie and cut off the excess. Your giant stitches do leave dimples in the skin, though. Another method is to pipe the cut edges. This means reinforcing them by rolling them over a length of 3mm cord, which is held in with a row of stationers foldback binder clips until youve finished piping. Pin the piped edges to the temporary battens so that they just meet accurately in the middle, and then sew them to each other. Dont use this sewing to put a lot of tension in the deck, or youll get a puckered seam. The seam on the deck will be visually obvious and its unlikely to be a perfectly straight line. You could make a feature of it, by deliberately sewing a seam with sinuous curves, like a snake lying along your deck. |
| (If your cloth is not wide enough to go round the kayak and meet in the middle of the deck, take some offcuts of fabric, make pieces of fabric that will fill the gaps in the deck, and sew them to the hull skin along the gunwales.) If youre me or Bruce Lemon, youve already fitted the cockpit coaming so now you fit the cockpit coaming flange.. The more common method is to fit both the coaming and flange at this stage, by simply sewing them on top of the deck skin.. |
|
| Heat-shrink the skin using a domestic iron. If the skin is nylon, start by making it thoroughly wet by spraying water on the outside of the skin before you use the iron. If you intend to dye the skin, rather than using a tinted coating or leaving it uncoloured, you can spray on a water-based dye during this process. Dyes for nylon just rinse out unless theyre fixed by heating the nylon up to a high temperature. |
Heat-shrink the skin using a domestic iron. If the skin is nylon, start by making it thoroughly wet by spraying water on the outside of the skin before you use the iron. If you intend to dye the skin, rather than using a tinted coating or leaving it uncoloured, you can spray on a water-based dye during this process. Dyes for nylon just rinse out unless theyre fixed by heating the nylon up to a high temperature. |
| Apply a waterproof coating (hypalon, polyurethane, etc). | Apply a waterproof coating (hypalon, polyurethane, etc). |
| Fit external rub-strips by screwing through the skin into the keel and/or stringers. | Fit external rub-strips, and a skeg if required, by screwing or pegging through the skin into the keel and/or stringers. |
| Use a hot wire to melt through the skin to the holes you previously drilled in the frame, and add the deck-lines and other fittings. | Use a hot wire to melt through the skin to the holes you previously drilled in the frame, and add the deck-lines and other fittings. |
| With or without champagne, launch your boat. | With or without champagne, launch your boat. |
Go to:
Contents page for this article
Go to next page for:
• Rough timber for the moulds